Hello Hackintosh lovers, today I will guide you on how I manage to run the latest macOS Catalina 10.15.4 on my AMD Ryzen Processor. It works pretty well, stable, and very fast. I will try to explain every step that I took to get this Catalina up and running. After success installing the macOS Catalina on my AMD FX8350 build, now I want to install macOS Catalina on my AMD Ryzen.

So basically, this installation uses the Vanilla method. This means we use the original macOS operating system from Apple without any third party or any crappy software. This is the best way to install Hackintosh. Also, I choose to use the OpenCore boot loader on this setup.
Check my other Hackintosh Tutorials
- Install macOS Catalina on AMD FX 8350 and Asrock 970 motherboard with OpenCore
- How to install macOS Catalina on AMD FX 8350 and Gigabyte GA-970a-D3P with OpenCore
Before we jump into the installation steps, here is my computer specification on this Hackintosh build. Also, this will be a very long article…

PC Specs
- Motherboard: MSI B450M Pro M2 Max
- Processor: AMD Ryzen 3 3200G
- Graphic Card: Sapphire Nitro+ Radeon RX580 8 GB
- Samsung SSD 256 GB
- ADATA DDR4 RAM 8 GB
- NZXT Casing White
It’s just a low budget computer and I spent around USD 600 for this setup. But everything works very well.
What works:
- Almost every aspects are working
- USB ports
- Audio
- Graphic acceleration
- Shutdown, restart, sleep
Step by step installing macOS Catalina 10.15.4 on Ryzen 3 3200 using OpenCore boot loader

Step 1. Create macOS bootable USB disk
Basically, there are several ways to do this. You can use Windows, macOS or even Linux. I will not write the steps here because it will make this post way too long. So, I would recommend you to read my previous article to create a macOS USB bootable disk.
After this, you will have an EFI partition on your USB disk. But this partition still empty. We will populate this in the next step. If you created using Windows 10, you will have BOOT partition in your USB drive which contains OpenCore and EFI folder.
Step 2. Populating the EFI folder
In this section, you will need to copy my EFI folder to your USB installation disk. If your hardware is identical as mine, then this EFI folder should work straight away. No need for further modification. If you are on a Mac, you will need Clover configurator software to mount the EFI partition. If you are on Windows 10, the EFI partition should be mounted as BOOT partition.
Configure the EFI folder
In this section, we are going to configure our EFI partition. This EFI partition is required by the macOS system to boot. So, we need to properly configure it otherwise it won’t boot.
- Mount the EFI partition
First, we are going to mount the EFI partition on our USB drive. Use Clover Configurator to mount it. This is only available when you created the USB installation disk on macOS. For Windows users, skip this step since you can simply open the BOOT partition on your USB disk.
Once mounted, you can open partition because we are going to add some files to this partition.
2. Copy the EFI folder
As you can see your EFI partition is empty. If you have the identical hardware as mine, at least the motherboard and processor, you may try to use my EFI folder. Simply copy and paste the EFI folder to your EFI partition and you are good to go.
Note: If you use my EFI folder, make sure you change the serial number before you use your Apple ID. You can use the genSMBIOS application to generate the serial etc.
For more guide and troubleshooting, always check the Open Core official website. There is a lot of useful information. Next time I will show you how I build my own EFI folder for this motherboard and maybe another motherboard. Next, we are going to set some basic settings on the BIOS.
I will not every steps to configure the config.plist in this article. There is a better and more complete guide on how to configure your config.plist. Please visit the official OpenCore guide below:
https://dortania.github.io/OpenCore-Desktop-Guide/
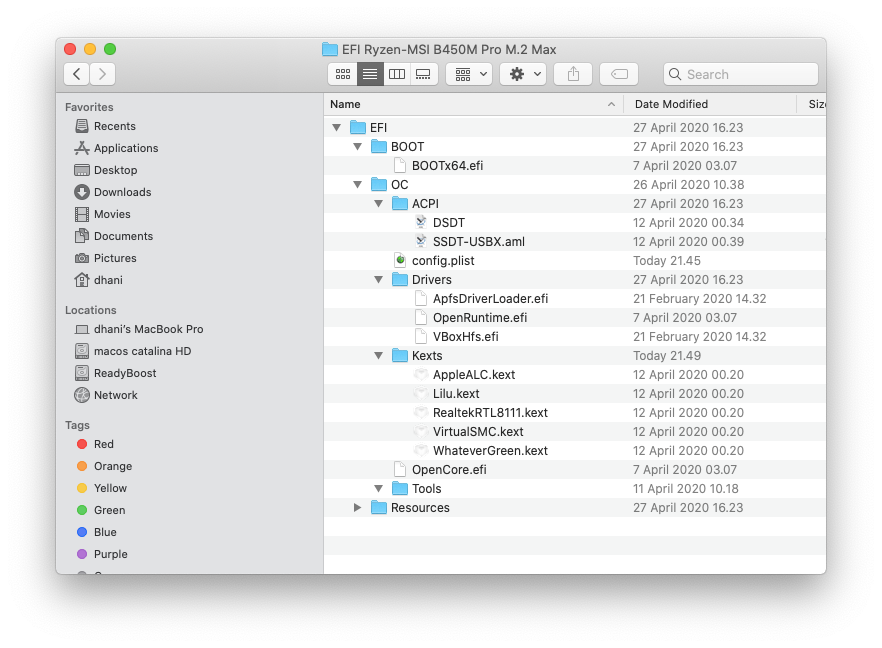
Below is my EFI folder structure

3. BIOS Settings
There are some important settings you need to change in the BIOS. But mainly, here are some settings that I use.
- Disable FastBoot
- Disable CSM
- AHCI enabled

Hi !
I have your efi download, everything is working fine.
except the audio doesn’t work, I can’t activate it.
* PC configuration.
Motherboard: MSI B450M Pro -M2 Max (MS-7B84)
Processor: AMD Ryzen 3 3100
Graphic Card: Radeon RX470 4 GB
256 GB SSD
ADATA DDR4 RAM 8 GB.
can you help me !
thank you !