

Debian Tutorial – Hello everyone today we will learn how to build Samba Server on Debian 9 Stretch. Debian is great OS for Server and Samba is special application suite that provides file and print services to Windows client. When we have Samba server enabled on a network, we can easily copy, edit and store files to the server from Windows machine. More information about Samba can be read from this link.
Objective
This tutorial will guide you to install and configure Samba server on Debian 9 Stretch. With this guide you will be able to install, configure Samba file server on your Debian 9 Server. I try to make it as simple as possible so anyone can follow my tutorial.
Scenario
The settings on the network could be different but the following tutorial can be used on most cases. Here are my scenario:
- Debian 9 is installed on a network with IP address 10.34.0.157
- The workgroup is “WORKGROUP”
- We will configure the secure samba server which only Samba users can access the resource
Steps to build Samba Server on Debian 9
Step 1. Install Samba and dependency files
apt install samba smbclient
Output example:
root@debian-vm:/home/dhani# apt install samba smbclient
Reading package lists... Done
Building dependency tree
Reading state information... Done
The following additional packages will be installed:
  attr libaio1 libarchive13 libavahi-client3 libavahi-common-data libavahi-common3 libcups2
  libfile-copy-recursive-perl libgpgme11 libldb1 liblzo2-2 libpython2.7 libsmbclient libtalloc2 libtdb1
  libtevent0 libwbclient0 python-crypto python-dnspython python-ldb python-samba python-talloc python-tdb
  samba-common samba-common-bin samba-dsdb-modules samba-libs samba-vfs-modules tdb-tools update-inetd
Suggested packages:
  lrzip cups-common gpgsm python-crypto-dbg python-crypto-doc python-gpgme bind9 bind9utils ctdb ldb-tools ntp
  | chrony smbldap-tools winbind ufw heimdal-clients cifs-utils
The following NEW packages will be installed:
  attr libaio1 libarchive13 libavahi-client3 libavahi-common-data libavahi-common3 libcups2
  libfile-copy-recursive-perl libgpgme11 libldb1 liblzo2-2 libpython2.7 libsmbclient libtalloc2 libtdb1
  libtevent0 libwbclient0 python-crypto python-dnspython python-ldb python-samba python-talloc python-tdb
  samba samba-common samba-common-bin samba-dsdb-modules samba-libs samba-vfs-modules smbclient tdb-tools
  update-inetd
0 upgraded, 32 newly installed, 0 to remove and 0 not upgraded.
Need to get 12.5 MB of archives.
After this operation, 59.5 MB of additional disk space will be used.
Do you want to continue? [Y/n]
Step 2. Create a new shared folder
After install, we need to modify some settings. The Samba server configuration file is located in /etc/samba/smb.conf. You can edit the file using nano or other text editor as you like.
nano /etc/samba/smb.conf
Create a new share
Add the following lines to the bottom of the file /etc/samba/smb.conf. Please note that I leave all the settings inside smb.conf as is. You may tweak it to meet your needs. The default value already gives a good security but it still can be improved.
[Database]
comment = Database on Debian Server
path = /mnt/database
browseable = yes
guest ok = no
read only = no
create mask = 0700
directory mask = 0700
Close and save the file. Now we need to create the actual directory to share.
mkdir -p /mnt/database
Now restart Samba
systemctl restart smbd
Add new Samba user
For example, I want to give access to user dhani to use the Samba resource
smbpasswd -a dhani
Now enter the new password for the user to access samba.
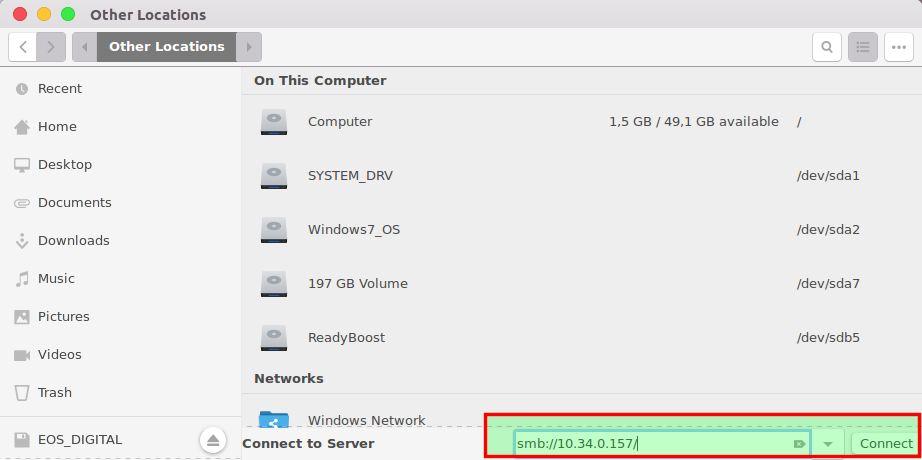
Step 3. Mount Samba shared folder from other computer
At this point, our Samba server is up and running. We can try to connect to the shared folder from other computer. For example, I connect to the Debian Samba Server from Ubuntu desktop.
Now we can see the shared folder list on the Debian Samba Server
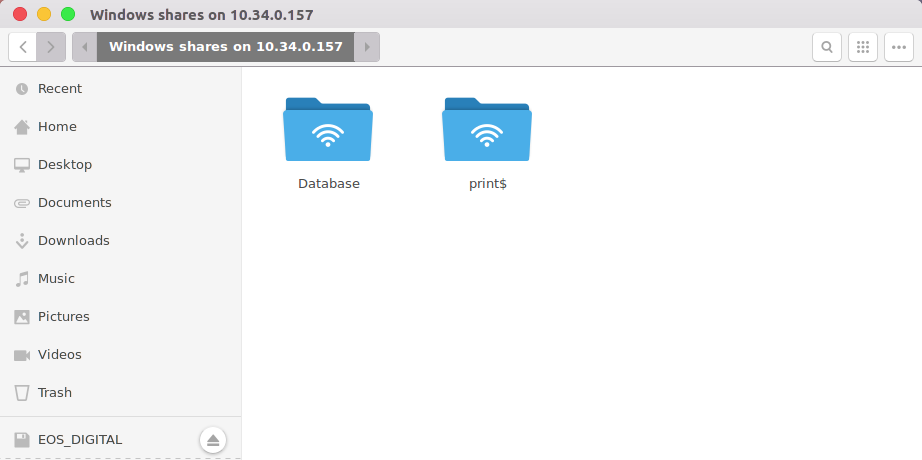
In order to connect to the Shared folder, it will ask for user and password. Enter the samba user and password we created earlier.
Leave a Reply