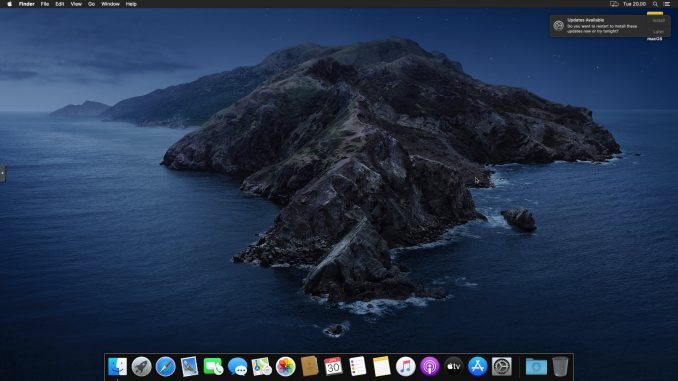
Hello Hackintosh lovers, today I am very excited to tell you that finally, I manage to install macOS Catalina 10.15.4 on my Proxmox home labs. So basically, I installed and run this macOS Catalina as a virtual machine (VM) inside my Proxmox Virtual Environment. If you don’t know what Proxmox is, you can read and check this great piece of virtualization system here. I was a bit skeptical when trying this out. But, personally I found that the overall performance of the macOS VM on Proxmox is very good. I don’t feel any differences between my macOS VM and my other Hackintosh on a dedicated PC.
This tutorial and workaround will not possible without the courtesy of this guy. All the credit goes to the guy who wrote this article and everyone who involves building and writing the software etc.

Before we jump into the installation process, let’s take a look at my Proxmox hardware specifications below.
- Processor: AMD FX-8350 8 core
- Motherboard: Gigabyte GA-970a-D3P
- VGA Card 1: MSI Radeon RX-570 8GB OC
- VGA Card 2: XFX Radeon R7 250 series
- Memory: 20 GB DDR3
- Hard disk: 1 TB
It’s an old processor that still uses DDR3 but it runs very smoothly. I also have a Windows 10 VM with GPU Passthrough enabled. I also will try to GPU passthrough this macOS Catalina VM so I can have much better video graphic performance.
Steps to Install macOS Catalina on Proxmox VE using OpenCore
Step 1. Create the macOS Catalina Installation ISO
There are two different ways to create your macOS Catalina ISO. If you have a real Mac or a Hackintosh, you can create an offline installation ISO. You won’t need to be connected to the internet during macOS installation if you created the ISO using this method. I would recommend using this method. It’s faster.
Create macOS Catalina Offline Installation ISO (for Mac or Hackintosh users)
If you don’t have a Mac or Hackintosh, you only have the following option. It works flawlessly but you need to be connected to the internet during the macOS installation process. You can use Linux or use your Proxmox to create this installer.
Create macOS Catalina Online Installation ISO
Upload the ISO to Proxmox. You can use the Proxmox Web GUI to do this. Or you can also manually upload the ISO to the following directory in Proxmox server.
/var/lib/vz/template/iso
Step 2. Prepare the OpenCore ISO
We are going to use the OpenCore boot loader on this build. Thanks to the genius guy who provide the OpenCore for the Proxmox Hackintosh build.
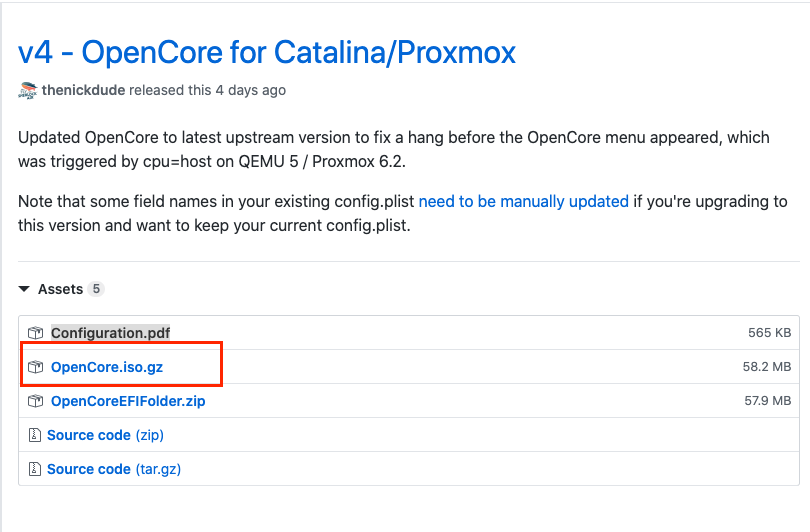
So visit this page, and download the file OpenCore.iso.gz file. Extract the file and you should have an iso file called OpenCore.iso. Maybe the new version is available. Feel free to try it instead.
So now, you already have the macOS Catalina ISO installer and OpenCore ISO boot loader uploaded to the Proxmox. It should looks like this on your Proxmox web dashboard.

As you can see, I have three ISO’s. Actually you only need two of them.
Step 4. Get the OSK Authentication Key
We are going to do some work here. This OSK key will make our hardware recognized as a real Mac by Catalina. You will need a real Mac or a Hackintosh to do this. First, copy the first C code-block on this page and save it as smc_read.c. You can use TextEdit to do this. And then change into the same directory as that file and run these commands.
xcode-select --install
o smc_read smc_read.c -framework IOKit
./smc_read
It will print out 64 characters OSK. Take note of that string because we will need it later.
Step 5. Create macOS Catalina VM
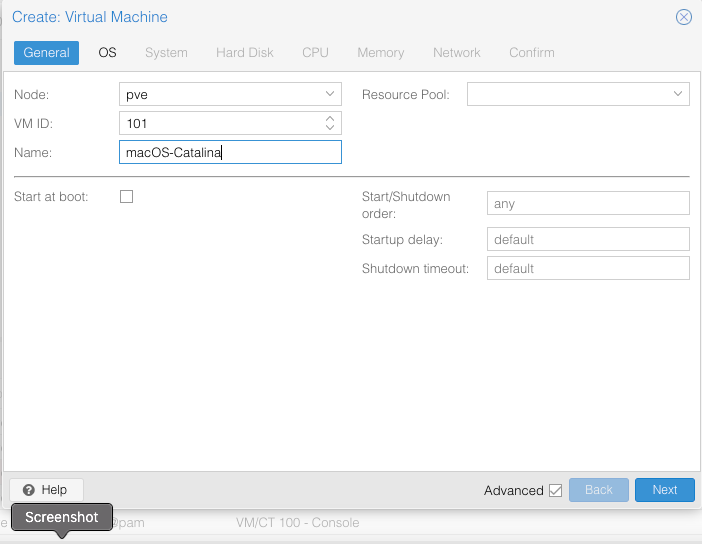
Now create a new virtual machine via Proxmox web UI. Follow the steps shown in the following screenshots. Login to Proxmox web UI and create a new VM.
Give a name for the new virtual machine. Take a note of the VM ID. We will edit the config file for this VM ID later.
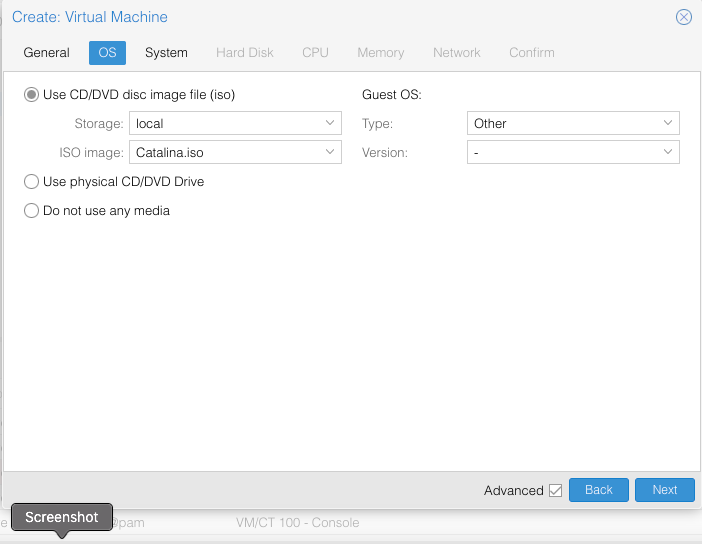
Next, choose the macOS Catalina installer ISO file. And choose Other on the Guest OS type.
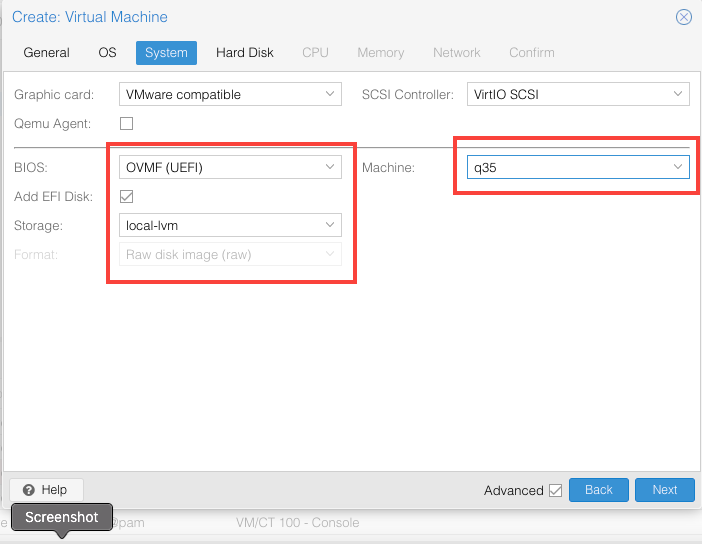
Choose OVMF (UEFI) on the BIOS type, and then make sure you enable the Add EFI Disk and choose the storage. Next, choose q35 on the Machine type.
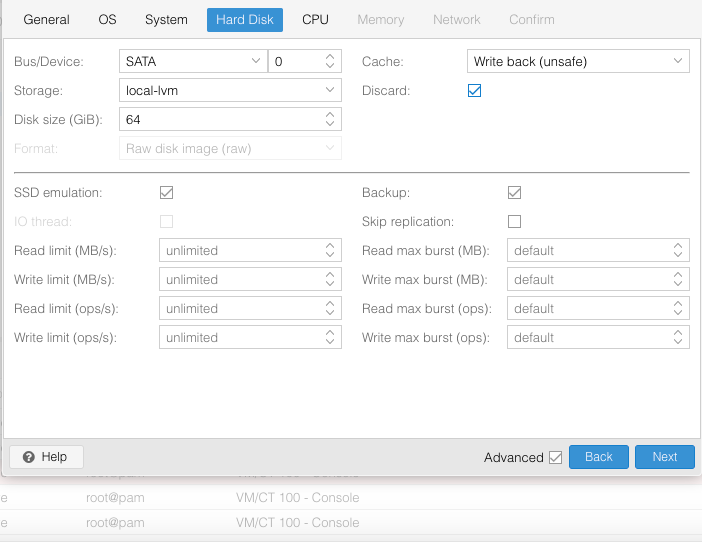
Next add the SATA disk. I put 64 GB on the disk size. You can put more than this if you like. Don’t forget to enable SSD emulation feature and choose Write back (unsafe) on the Cache settings.
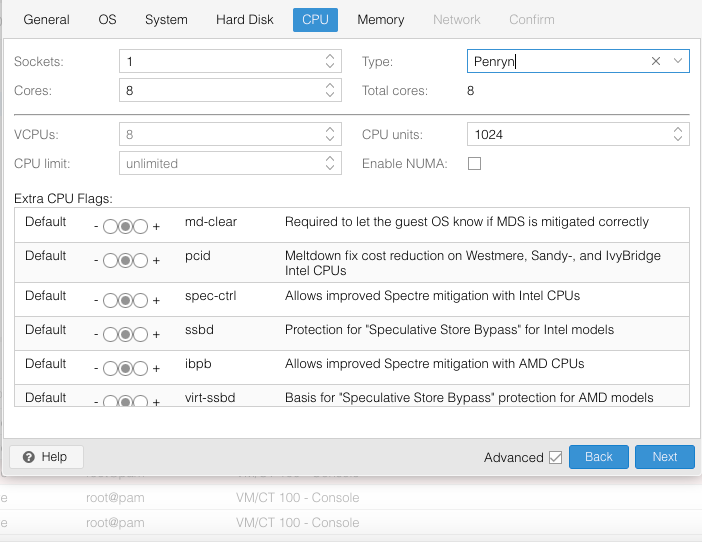
On the CPU tab, assign the number of cores and choose Penryn on the CPU type.
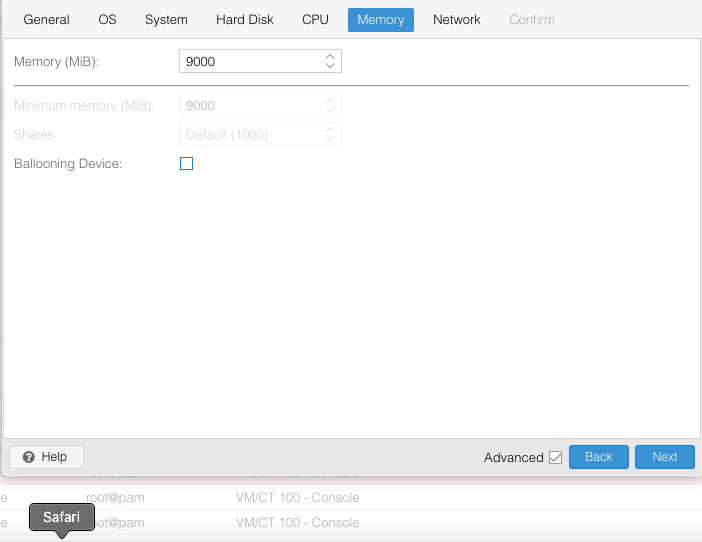
Now assign the memory (RAM). I would recommend to assign more than 8 GB or RAM to the vm. Disable the ballooning feature.
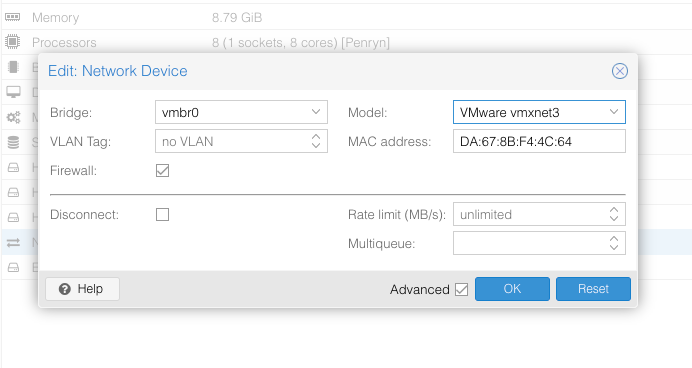
Final step is to configure the network. Choose the VMware vmxnet3 on the network model.
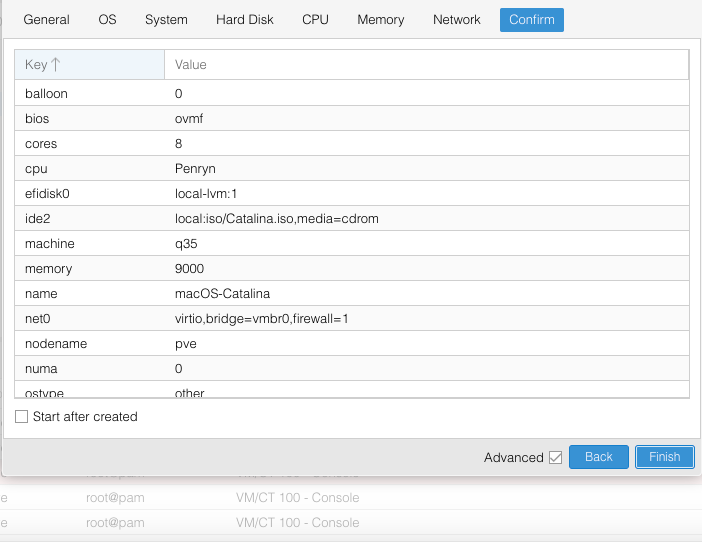
Finally, your new vm summary. Click Finish if you are satisfied with all the settings.
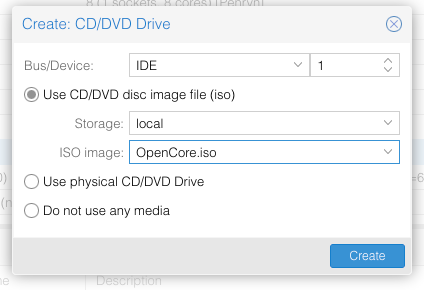
Next, we need to add one more CD/DVD Drive. We will use it for OpenCore boot loader ISO. Go to the Hardware section of your new VM and then click Add >> CD/DVD Drive. Choose the OpenCore ISO file.
Modify the VM config file
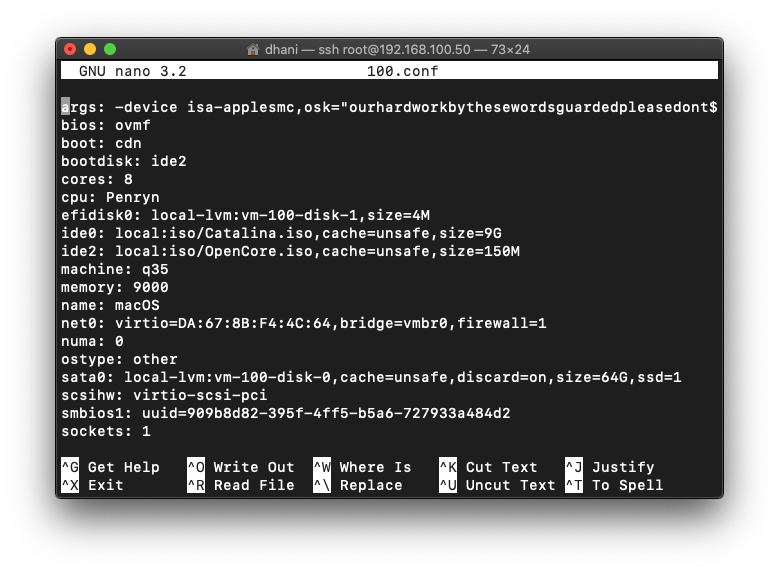
Now login to the Proxmox console. We are going to add some arguments to the VM config file. In this case, my VM ID is 100. So I will need to edit the file /etc/pve/qemu-server/100.conf. Make sure you change 101.conf with your actual VM id.
If you are running Intel processor, add the following line to the config file
args: -device isa-applesmc,osk="YOUR-OSK-CODE" -smbios type=2 -device usb-kbd,bus=ehci.0,port=2 -cpu host,kvm=on,vendor=GenuineIntel,+kvm_pv_unhalt,+kvm_pv_eoi,+hypervisor,+invtsc
Change YOUR-OSK-CODE with the OSK code you generated from the previous step.
For AMD Processor
args: -device isa-applesmc,osk="YOUR-OSK-CODE" -smbios type=2 -device usb-kbd,bus=ehci.0,port=2 -cpu Penryn,kvm=on,vendor=GenuineIntel,+kvm_pv_unhalt,+kvm_pv_eoi,+hypervisor,+invtsc,+pcid,+ssse3,+sse4.2,+popcnt,+avx,+avx2,+aes,+fma,+fma4,+bmi1,+bmi2,+xsave,+xsaveopt,check
Make sure the argument is in one/single line. Next, scroll down and find the following line
ide0: local:iso/Catalina.iso,media=cdrom,size=9G
ide2: local:iso/OpenCore.iso,media=cdrom,size=150M
Change the media=cdrom with cache=unsafe. So it will become like this
ide0: local:iso/Catalina.iso,cache=unsafe,size=9G
ide2: local:iso/OpenCore.iso,cache=unsafe,size=150M
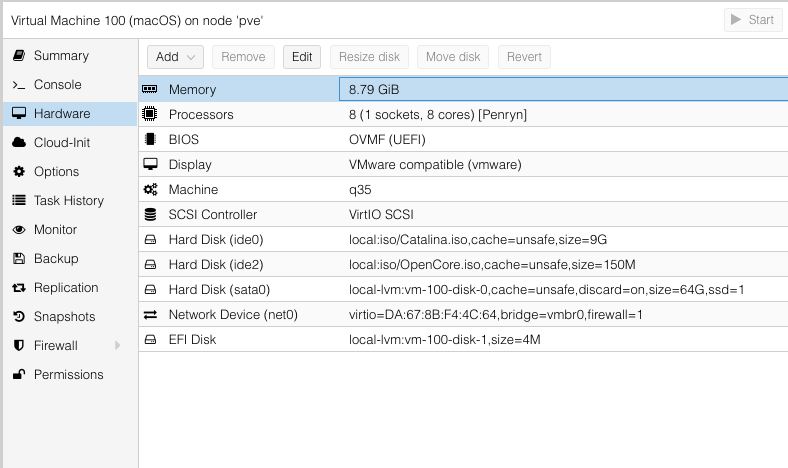
Doing this way, Proxmox will see the both IDE devices as hard drive. The final config file will looks like this
Here is the hardware section on the Web UI looks like
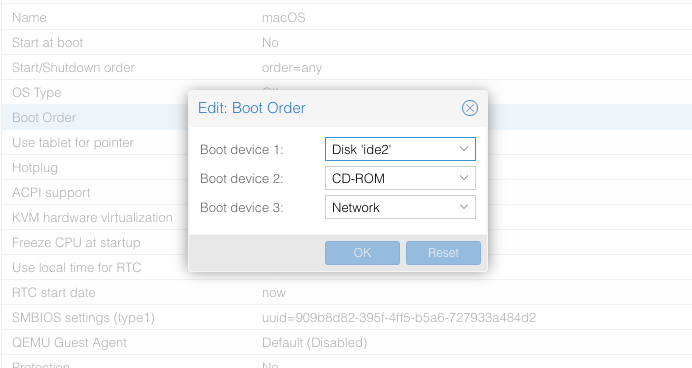
Now go to Options page, and then double-click Boot Order. Change the boot order so the OpenCore contained device is the first order.
Configure Proxmox
Execute this command on Proxmox server to avoid bootloop during macOS boot.
echo 1 > /sys/module/kvm/parameters/ignore_msrs
Make it permanent during boot with this command
echo "options kvm ignore_msrs=Y" >> /etc/modprobe.d/kvm.conf && update-initramfs -k all -u
Done.
Start the macOS Virtual Machine
Now start the vm and you should see the following boot menu appear.

Now you can continue and install macOS Catalina on the Proxmox VE. In a few moments, you should see the macOS Utilities window.

Click Disk Utility and then Continue. You will end up with the following window. We are going to format our disk for macOS installation.

Click the sidebar to show all devices. The hard disk will be marked as external disk, but it is fine. Next click Erase and then choose APFS and GUID Partition Map as shown below.
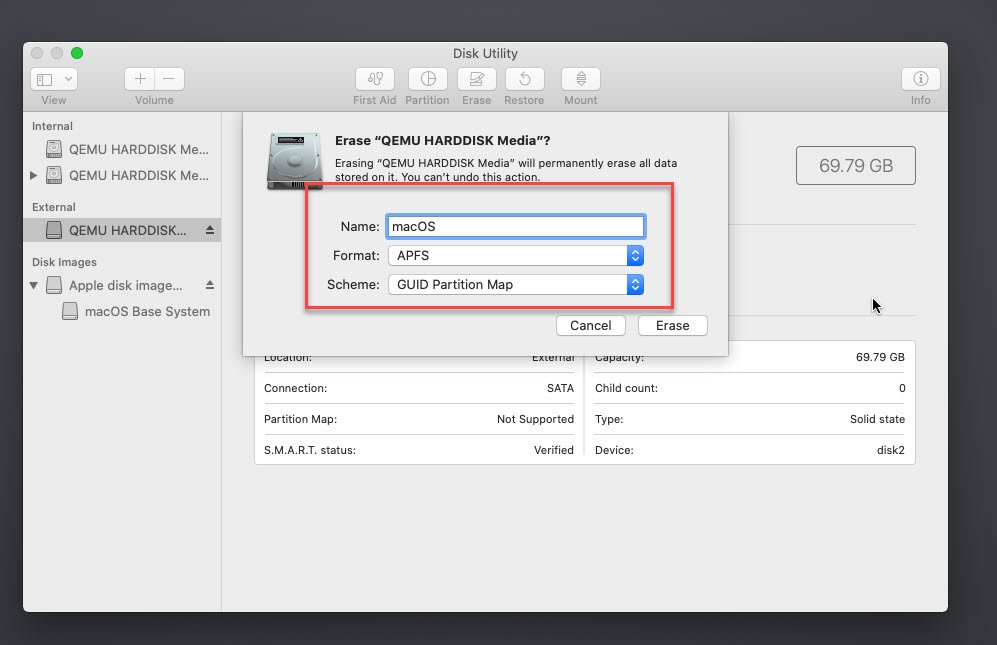
When finish, close the disk Utility and then click Install macOS from the main menu. Follow the installation steps.
Continue the installation
When all goes well, you should be able to see the macOS Catalina desktop. The installation is completed but we need to make some changes so this new macOS VM can boot without the OpenCore ISO.
Configure the macOS Catalina VM
Copy the EFI folder
We need to copy the EFI folder to the EFI partition on the macOS hard disk. By doing this, we can remove the OpenCore.ISO file for booting. Your system will automatically boot to the macOS hard disk without needing the OpenCore.ISO.
First, from your macOS VM, download the Clover Configurator. We will use this software just for mounting the EFI partitions. You can use another method if you like. Open Clover Configurator and then click Mount EFI. You should see several EFI partitions on the list as shown below.

So, we are going to copy the EFI folder from the EFI partition on the OpenCore ISO to the macOS hard disk.
Mount both the EFI partition and then copy the EFI folder to the EFI partition on the macOS hard disk.

Done.
Enable Screen Sharing
I would recommend to enable the macOS screen sharing. You can then use any VNC viewer software from another computer to connect to the macOS VM.
Change the boot time out
By default, default boot wait time is set to 0, which means, it will not boot unless you press Enter on the selected boot device. I would recommend changing this value to 5 seconds. You will need to edit the config.plist inside the OC folder in the EFI partition. I use properTree software to edit the config.plist.
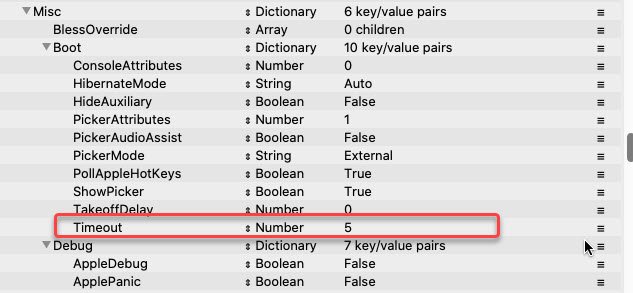
Performance
I realize that the performance of this macOS Catalina on Proxmox is very poor. But, we can improve it by enabling the GPU Passthrough. Stay tuned on this blog and I will show you how to improve performance of the macOS VM.


I followed the guide and had success with an intel cpu, now I have a amd cpu 3950x and its stuck at the apple logo icon when trying to boot. I used the amd args but no luck. Any suggestions?
Maybe you should enable the verbose mode. Add the -v in the args on the config.plist.
This way, you can see the error message that makes you stuck. Otherwise, we don’t know what error you have.
I tried and could not start the VM 😦
I had success by downgrading to OpenCore 5 vs the newest version out.