

Hello everyone, I am currently building my small homelabs system using my old AMD FX-8350 processor. I am running the latest Proxmox 6.2.4 and it works very well. But lately, I want to do something different. Proxmox supports the GPU passthrough which is interesting. We can assign and use the power of our GPU to one of the virtual machine. There are some steps to do the GPU passthrough. It is not super simple but doable. We will get through there in a moment.
This tutorial is based on the AMD processor. There are some pretty basic differences between AMD and Intel processor. You can visit the official guide on Proxmox website. If you are new to Proxmox and GPU passthrough things, it is better to read it first.
Steps to Enable GPU Passthrough on Proxmox 6.2
Step 1. BIOS Settings
It is important to set the BIOS prior to the GPU passthrough. You will need to enable the VT-d, Virtualization as well as UEFI.
Step 2. Enable the IOMMU
This step will enable the IOMMU by editing the Grub. I would recommend you to connect to the server via ssh from other computer.
On the host machine, we are going to edit the grub.
nano /etc/default/grub
Now find the following line
GRUB_CMDLINE_LINUX_DEFAULT="quiet"
And then change the line into this one
GRUB_CMDLINE_LINUX_DEFAULT="quiet amd_iommu=on"
Close and save the editor and reboot Proxmox server. After reboot, connect via SSH again and run this command to confirm.
dmesg | grep -e DMAR -e IOMMU
You should see something like this:

If it returns nothing, then something is wrong. You need to check your hardware configuration and/or maybe there are some unsupported hardware.
Step 3. Load Additional Kernel Modules
Here we are going to add some modules to our Proxmox server. Add the following lines to /etc/modules
vfio
vfio_pci
vfio_virqfd
Close and save the file. And then reboot the server again.
Step 4. Verify the IOMMU Interrupt Remapping
It is important to make sure that our system supports the Interrupt Remapping. To check, use this command
dmesg | grep 'remapping'
You should see something like this

AMD-Vi means the interrupt remapping is enabled so we are good to go from here. And you can also use this command for more results.
dmesg | grep -e DMAR -e IOMMU

Step 5. Get GPU id
Now we need to get our GPU id and configure the Proxmox. Execute this command to get the GPU id and the associated vendor id.
lspci -v
Output:
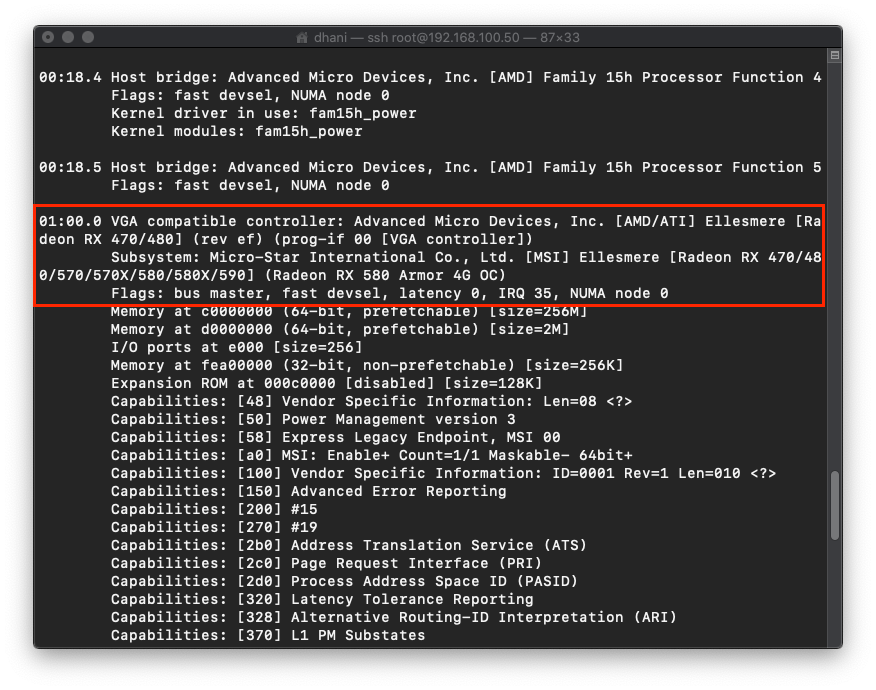
As you can see, my Graphic card id is 01:00. Now lets run another command to get the vendor id
lspci -n -s 01:00
Output:
01:00.0 0300: 1002:67df (rev ef)
01:00.1 0403: 1002:aaf0
Due take a note of the vendor id shown. In this case, 1002:67df and 1002:aaf0
With this vendor id, we need to assign these two values to vfio. Use this command and don’t forget to change the vendor ids with yours.
echo "options vfio-pci ids=1002:67df,1002:aaf0" > /etc/modprobe.d/vfio.conf
Reboot Proxmox VE. So basically, we were done configuring the Proxmox host to provide the GPU passthrough feature. Next, we are going to create a new VM that will be used for Windows 10.
Step 6. Create a New VM
Here we are going to create a new VM. But do not start it because we will add some configuration to this new VM manually.
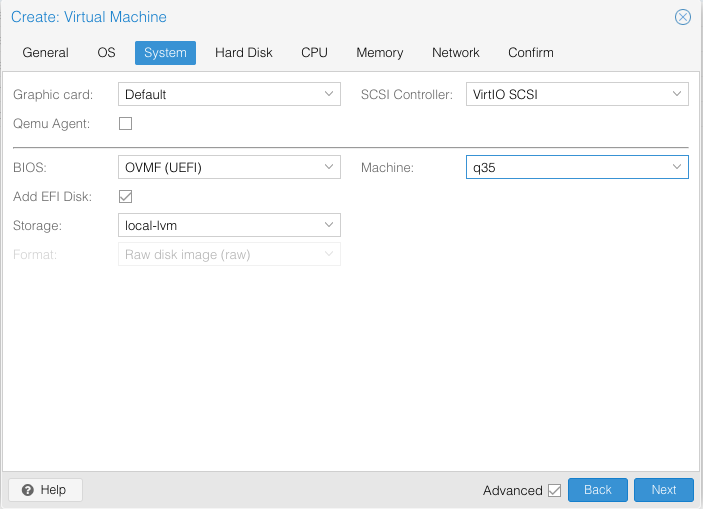
Create a new VM from the Proxmox web interface. But make sure you choose or use the following settings:
- BIOS: OMVF (UEFI)
- Machine: q35
Follow the wizard until it completes and then install Windows 10 completely. Make sure you set the Remote Desktop on the newly installed Windows 10 because after we configure GPU passthrough, you won’t be able to use the console from the Proxmox web dashboard. Once you set up the remote desktop. Shutdown the VM.
Step 7. Additional Configuration for Windows 10 VM
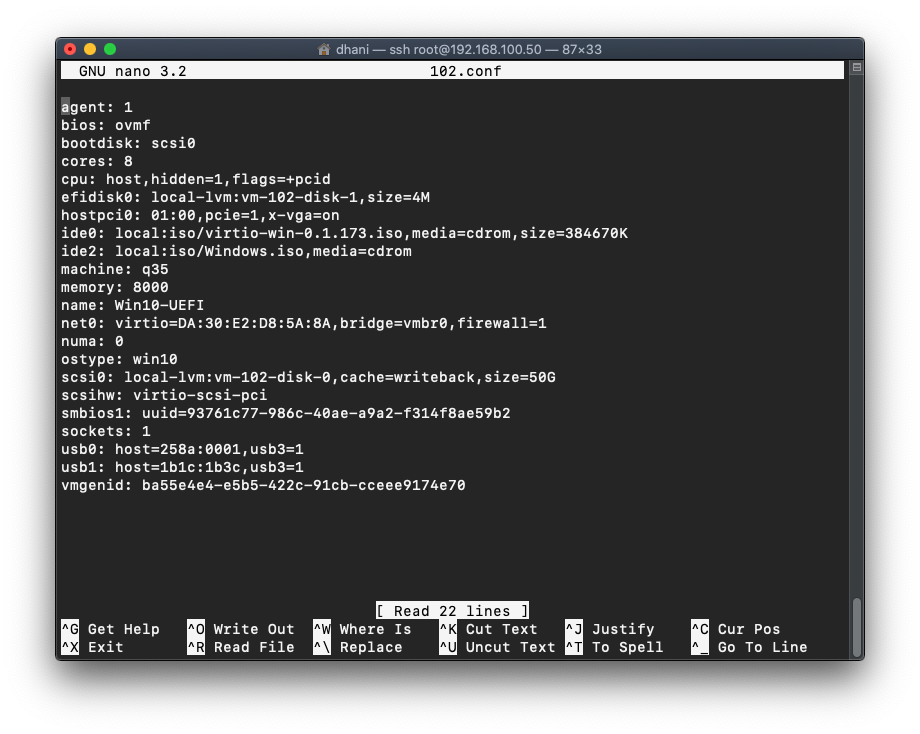
Now lets SSH to the Proxmox server once again and edit the new Windows 10 vm conf. In this example, my new Windows 10 conf file is in /etc/pve/qemu-server/102.conf. Add the following lines to the config file.
cpu: host,hidden=1,flags=+pcid
hostpci0: 01:00,pcie=1,x-vga=on
Here is my full config screenshot
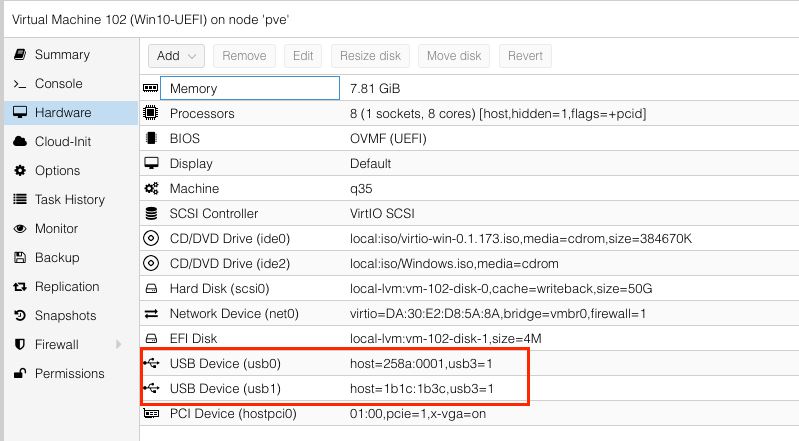
If we switch to the Proxmox web console in the hardware section, it looks like this.

As you can see, there is a PCI Device (hostpci0) at the end of my hardware list.
Now start the Windows 10 VM and remote desktop to it. Check if the Graphic card is detected and active in your Windows 10 VM.

Alternatively, you can also use a monitor connected to your VGA card and use the Windows 10 VM on that monitor. If you do this, you may also want to passthrough the mouse and keyboard as well.
i make installation of Catalina under proxmox like in your dosc
then i try to passthrough pcie and
first time boot my display work but after balck screen
system show rx 480 card but
monitor is blank
Hi,
I hope you already setup your macos for remote desktop via VNC. So you can change some settings from other pc.
I have similar problem. MacOS will detect your RX card and the proxmox display as two separate monitor.
Connect via VNC and set/change the multiple display settings from there.
Make your external monitor as the main display.
Hi, connect to your Mac via VNC and from there you can change the display settings. You may need to enable the mirroring feature from System Preference >> Display
set standart display to none
and see apple after all but progress indicator is freezee
i now can enter if use default display another type than VMvare
but still cant see other displays ((
Hi…while you are able to login, have you enable screen sharing for vnc connection?
I enable all option in the pcidevice including rombar.
I use vmware cmpatible vga…please play with the pcidevice, remove it and then add again..i had the same issue as you before.
it see device but not see monitors
I cant enter with VNC (connection reset by peer) ((((
Should i keep enabled ROM-BAR option?
can i enter by ssh and setup via cli?
if yes please suggest appropriate commands
Excelent guide! Thank you. I have run into a few problems that I cannot seem to explain.
First some info:
-I have run qemu-kvm with gpu passthrough before on Ubuntu with this machine. It worked but IO performance was bad so I am now trying proxmox.
-I have 2x gpu’s. one nvidia setup in pcie3 slot, bios set to boot from gpu in pcie3 for host to use. Another GPU is an AMD R9 290. setup in pcie1 for passthrough to guest.
-I have two sets of mice and keyboard
-I installed LXDE on the host to have a gui. I only have this one machine and cannot connect to the webinterface from another computer.
I passed through 1 of my 2 Keyboards. One of them is ps/2 for host operations. The other is passed through to the win10 guest. I passed one of my two USB mice to the guest.
When I start the win10 guest, the mouse and keyboard freezes on the host. The monitor connected to nvidia gpu stops updating frames and is just kinda frozen on whatever whas on the screen at that time. The guest comes up no problems with gpu oassed through. What seems to be causing this peculiar problem of the host monitor/mouse/keyboard freezing up? Shutting down the VM does not change everything back to how it worked before I started the win10 guest.
Pretty good guide, very comprehensive!
Unfortunately, I’m having issues and the VM doesn’t start.
On a side note first: I assume this line
hostpci0: 01:00,pcie=1,x-vga=on
in the .conf file needs to be adjusted with the actual bus number (i.e. change your 01:00 against whatever else the VGA card reports, 2f:00 in my case), right?
So ffter I’ve done everything in the guide, my Windows doesn’t even boot anymore: after the “Start” command, the log at the bottom just shows a wheel, and the VNC client cannot connect to it.
I then tried to start the vm via the command line “qm start 102” to possibly get some error log, however, even the command line is stuck and I can’t even interrupt it with ctrl-C.
Ok…so you already have Windoslws vm before you enable the gpu passthrough?
Its worth to make sure that your Windows vm has the ovmf bios as well as q35 machine. These are important. Check your vm settings.
Yes, that is correct.
This line
hostpci0: 2f:00,pcie=1,x-vga=on
is the culprit, when I add it, then qm gets stuck right away so I have to kill it.
The rest of my config looks like this, I have double checked it several times:
agent: 1
bios: ovmf
bootdisk: ide0
cores: 1
efidisk0: local-lvm:vm-102-disk-0,size=4M
ide0: /dev/sdb,size=244198584K
ide2: local:iso/virtio-win-0.1.185.iso,media=cdrom,size=402812K
machine: q35
memory: 8192
name: Win10.local
net0: virtio=1A:A0:7F:5C:18:E1,bridge=vmbr0,firewall=1
numa: 0
ostype: win10
scsihw: virtio-scsi-pci
smbios1: uuid=c1c886d7-2506-4260-bcf2-90afa8f4946e
sockets: 1
vmgenid: b8258097-3b2a-425d-9f64-ec3eea609477
Hi I am sorry, I assume you add the line hostpci0: 2f:00,pcie=1,x-vga=on manually by editing the conf file. If so, to avoid error, you can do it via web dashboard. Click the VM and then go to Hardware section and add PCI device from there.
Choose the graphic card from the list.
https://wp.me/a8HN2U-2fN
https://wp.me/a8HN2U-2fM
So as I’m a total newbie to this, I think these instruction are already streamlined to get the desired results, but I want to point out that in my attempts to fix my issue, I noticed that a few things seem to be inconsistent with the official documentation:
-the Grub changes should be made permanent with the update-grub command
-I’m, not sure if Grub should get updated at all. As far as I understand it correctly, Grub is only relevant for the legacy SeaBIOS boot. As we want to boot via EFI/q35, I understand the SystemD-boot should be adjusted instead
-in the original description, there is an additional kernel module vfio_iommu_type1
-the module change ought to be made permanent in the initramfs via
update-initramfs -u -k all
However, with all these steps performed, the VM still refuses to start, so I need to dig more.
PS: yes, I tried both possibilities to add the PCIe device, adding the line in the conf file and using the GUI, the results (command line and not working VM) are still the same