Hello everyone, welcome again to my blog. Today we are going to learn about how to migrate WordPress site from one hosting to another. On this tutorial, we are going to migrate our WordPress site using manual method. No WordPress plugin needed. Well there are many plugins that can help you to backup or migrate your WordPress site. But here we are not going to use any plugins. Let’s do the WordPress migration manual way. I wrote this article based on my own experience when moving or migrating my WordPress site at gamblisfx.com from Hostgator to Linode Cloud Server.
This tutorial is not for a true beginner. At least you must have a basic understanding on apache web server installation, MySQL backup and restore command and also some basic Linux commands.
Why you need to Migrate WordPress Site?
There could be several reasons why you should migrate or move your WordPress site to another host. For example:
- Your current hosting has very limited space and you want to upgrade to a bigger one
- You need a more powerful server
- Awful support from your hosting provider
- You need a dedicated cloud server for your website
- Or any whatever reasons you may have
If there are WordPress Migration Plugins, Why we do it manually?
Well, there are many WordPress migration tool. But most of the great tool comes with some price we have to pay. If you want to save money, this manual migration way can save you some bucks. In the end, it is up to you to choose the manual way, or using plugins. On this tutorial, I am going to move my WordPress site hosted in Hostgator and I want to move it to my Linode cloud server. Well, there are several steps to be done in order to move WordPress site manually. But don’t worry, it shouldn’t be take long. If you are using other hosting company, you may modify the steps below to match your current configuration.
Steps to Migrate WordPress from one host to another
In this example I want to move my existing website hosted in Hostgator to Linode cloud server. I have access to both server, so the following steps are mostly done via ssh connection. We need to prepare our new cloud server with LAMP (Linux Apache MySQL and PHP). You can read the following article if you want to install LAMP Server on various Linux distributions:
We don’t need to install WordPress on our new host. We have all WordPress files and configurations from the old host.
Old Hosting Details:
- Address: gator4011.hostgator.com
New Hosting Details:
- Address: 69.164.198.205
Step 1. Copy the old website to the new host
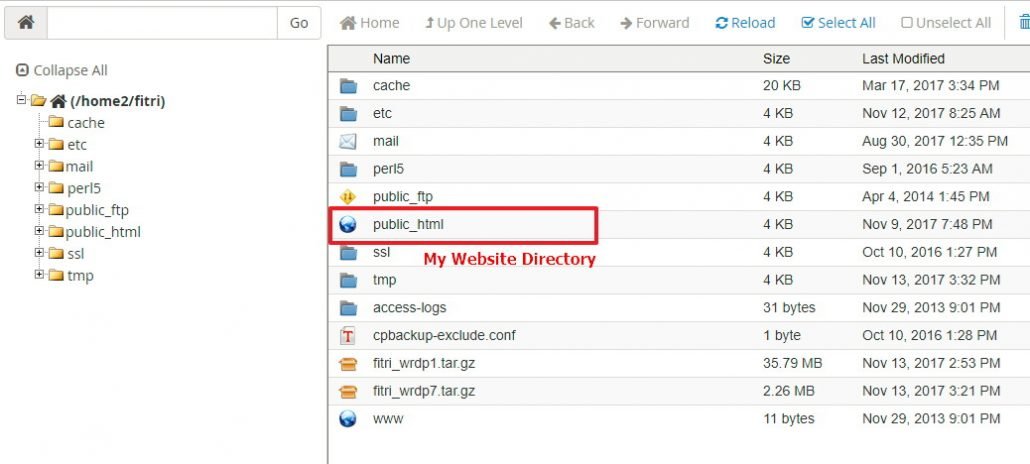
On this example I am going to copy my website from Hostgator server to my new server at Linode. So, what I am going to do here is to copy the website directory (in my case public_html) to my new web server directory /var/www/html.
Recommended reading:
Login to the old host via ssh from your computer (Linux) or Windows using Putty. Read the above article to find out how to do this in Windows.
ssh -i id_rsa_01.ppk dhani@gator4011.hostgator.com -p 2222
Now we are in the Hostgator Terminal. Copy the content of the public_html to /var/www/html on the new host.
rsync -avv public_html/ -e ssh root@69.164.198.205:/var/www/html/
The command will copy all the files and folders inside public_html to the remote server and put them inside /var/www/html.
This method will save time than if you have to download the public_html first and then upload to the new host. With this method, we copy directly to the new host from the old host.
Step 2. Backup MySQL Database on the old host
Still on the old host Terminal, we need to backup the MySQL Database and then transfer to the new host. Use this command to dump/backup MySQL Database
mysqldump -u root -p wordpress01 > wordpress01.sql.gz
Don’t forget to change wordpress01 with your actual database name. This command will produce a new backup file wordpress01.sql.gz that contains database information for our WordPress site. We will transfer this file to the new host. Use this command to copy the file to new host.
rsync -avv wordpress01.sql.gz -e ssh root@root@69.164.198.205:/tmp
The command will copy wordpress01.sql.gz to /tmp directory in the new host.
Step 3. Configure WordPress site on New Host
To continue migrate WordPress site, we still need to do some other things. We need to configure our new WordPress site in the new host.
Restore MySQL Database
use the following command to restore the MySQL database from the backup file we created earlier.
cd /tmp
mysql -u root -p wordpress01 < wordpress.sql.gz
Create new MySQL User and assign privileges to the database
mysql -u root -p
create user dhani identified by ‘12345’;
grant all privileges on wordpress01.* to dhani@localhost identified by ‘12345’;
flush privileges;
exit;
Edit wp-config.php
After we restore MySQL Database to the new host, we need to modify the wp-config.php file inside /var/www/html/
cd /var/www/html
nano wp-config.php
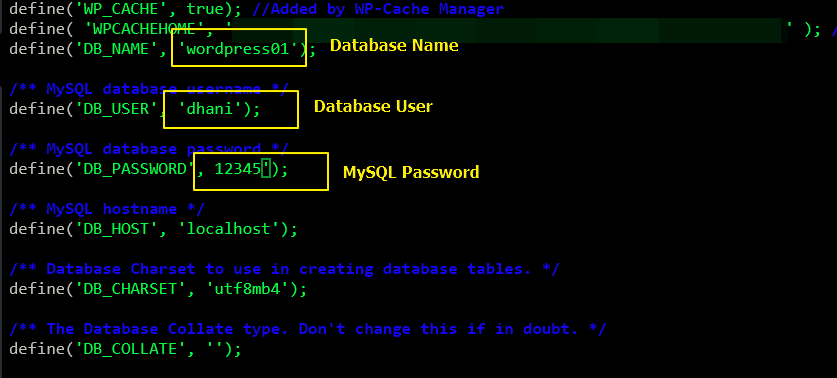
You will need to enter your MySQL Database name, user and password in the following lines
Make sure you enter the correct information here. At this point, we have configured our new server with MySQL database. Next we need to re configure the domain nameserver. We have to change the domain to point to our new server.
Step 4. Change the Domain Name Server
On the previous steps we are successfully moved and configured our WordPress in the new host/server. There still one last important step. Changing the domain name server. We need to change the domain name server (DNS) to point to our new server/host. In this example, I will change my DNS from Hostgator to Linode. So, first thing is to add the domain to Linode.
Configure DNS on Linode
Login to Linode console, and then go to DNS Manager. Click Add a domain zone to add your domain to Linode.
Make sure to select : Yes, insert few records to get me started, using this Linode. Then specify which Linode instance you want to connect to this domain. Click Add a Master Zone. Done.
Change the Domain Name Server on the Domain registrar
In this case, I registered my domain via Hostgator. So, the following steps are based on Hostgator and could be different with other registrar. You may ask your domain registrar to do this.
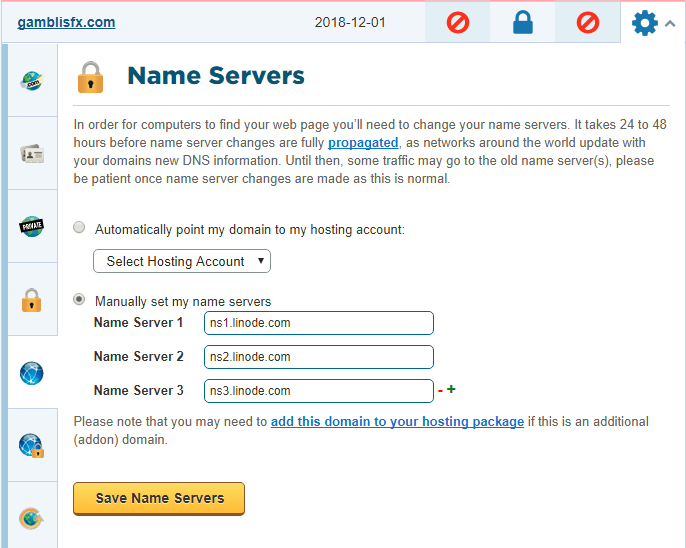
Login to Hostgator Customer Portal and go to Domains section. Click Manage Domain and then you should see your domain listed there. Click the domain name we want to change it’s Name Server.
In the name server, I typed the Linode name server which is ns1.linode.com, ns2.linode.com and ns3.linode.com
Save it and you are done. Wait until the new name server propagated and this could take few hours.
Final Thoughts
Migrate WordPress site from one host to another host is pretty easy. Well, if you choose not to use any WordPress plugin, you can use this method. Thanks for reading this tutorial how to migrate WordPress to another host manually. If you have any questions please leave me comments.


I am curious about why you haven’t selected any plugin for migration. Manually migrating any site can be messy sometime due to complexity. There are some good plugins which can eventually make the process smooth like All in One WP Migration, Cloudways WordPress Migration and Duplicator.
Well, I tried some plugins (free ones) but it doesn’t seems to work properly. It hangs in the middle of the process due to low memory on my server.