

In this tutorial, I will show you how to extend LVM disk on Ubuntu 20.04. The LVM technology allows us to add new disk and then extend the existing LVM file system with the new disk. This is useful when our disk is getting filled up and need more space without having to re-install the whole system. In order to extend the LVM system, make sure you have the LVM partitions on your system.
LVM consist of 3 main parts:
- Physical Volume – Actual disks such as /dev/sda, /dev/sdb and so on.
- Volume Group – Physical volumes are combined into volume groups. For example: my_lvm_vg = /dev/sda + /dev/sdb.
- Logical Volume – A Volume Group is divided into several logical volumes. For example: my_lvm_vg divided into my_lvm_vg/data, my_lvm_vg/root, etc.
Step 1. Check the file system list
Use this command to list the file system
sudo df -h /home/

As you can see, the / folder is full and 100% used.
Step 2. Check the Physical Volume (pv)
We need to check and view our existing physical volume that is used by the LVM file system.
sudo pvs

Now we need to know our Volume Group name etc. It will also check if we have free space that we can use.
sudo vgdisplay
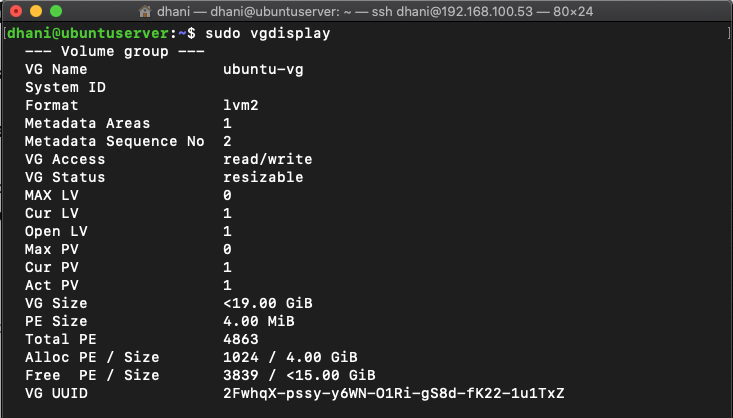
As you can see, my VG name is ubuntu-vg. Next, let’s display information about the Logical Volume
sudo lvdisplay
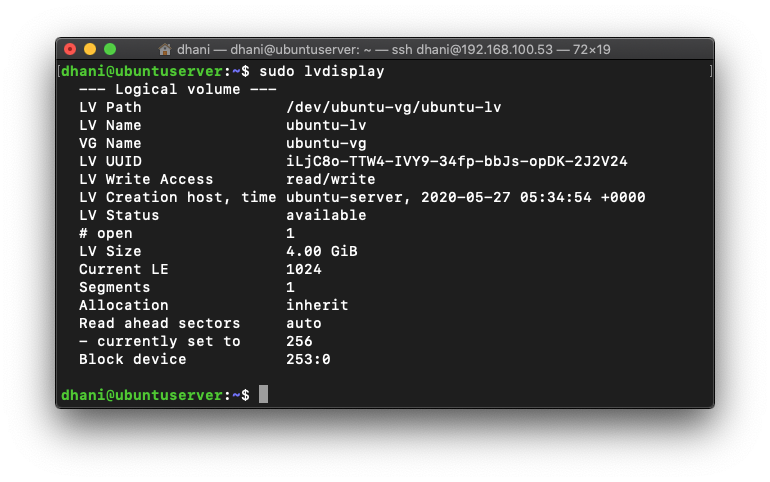
In this case, I have one volume group called “ubuntu-vg” and the ubuntu-vg has one logical volume called “ubuntu-lv“. We will use this information to add a new disk to this logical volume and volume group.
Step 3. Create a New Physical Volume
As now my new disk is attached to my server, we are going to configure it with the existing LVM system.
Get the new disk information
sudo fdisk -l
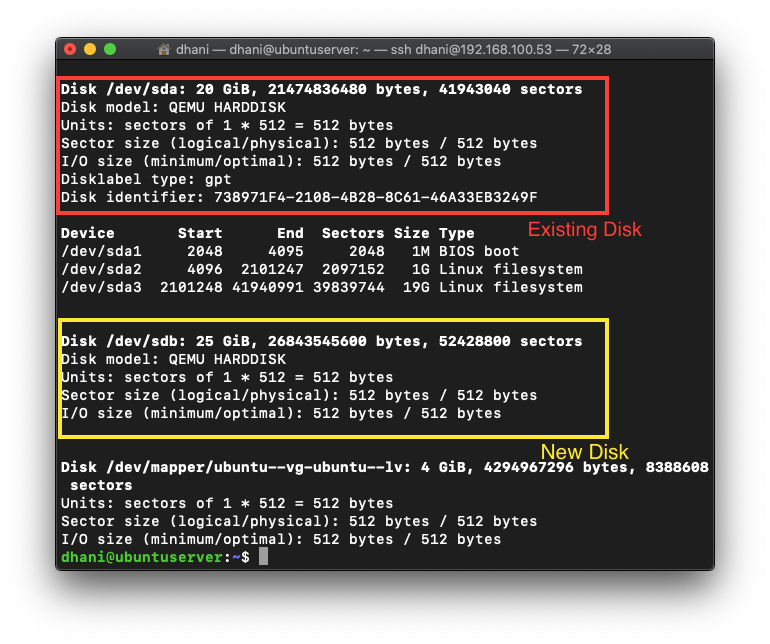
As you can see, my new disk is identified as /dev/sdb. This name could be different on every PC. So, due take a note of your new disk identifier/name. Alternatively, you can also use the lvmdiskscan command to display the LVM disk on your server.
sudo lvmdiskscan
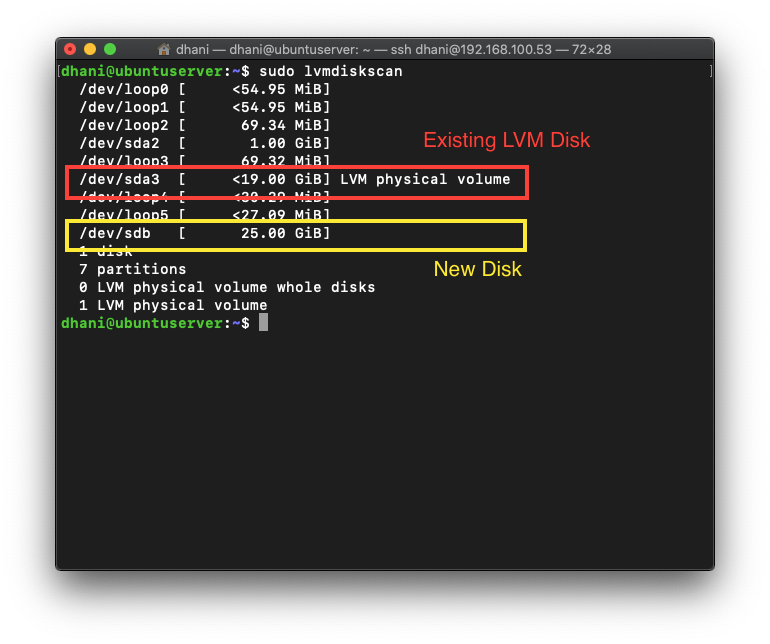
As you can see there is an LVM physical volume already in the system. Our new hard disk also recognized by the server. So, we are good to go.
Create new Physical Volume
Now we are going to create new physical volume on our new disk. In this case, my disk is /dev/sdb.
sudo pvcreate /dev/sdb
Output:
Physical volume "/dev/sdb" successfully created.
Next, we need to verify our new physical volume we’ve just created.
sudo lvmdiskscan -l
Output
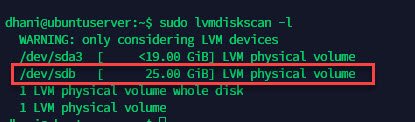
As you can see, my new /dev/sdb is now recognized as LVM physical volume.
Step 4. Add the new Physical Volume (pv) to Existing Logical Volume (lv)
Now I will add this new pv to my existing lv. My existing lv name is “ubuntu-lv” and the volume group name is “ubuntu-vg”
sudo vgextend ubuntu-vg /dev/sdb
Output:
Volume group "ubuntu-vg" successfully extended
Now if we check the volume group, it will have a new size:
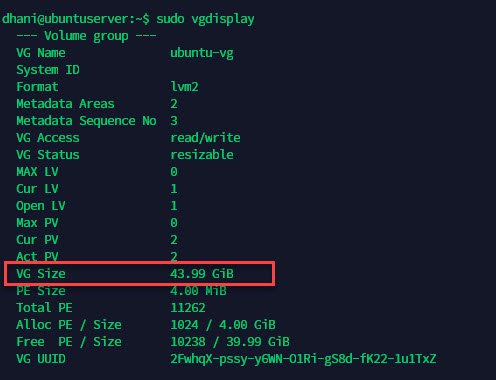
Now we need to extend the logical volume
sudo lvm lvextend -l +100%FREE /dev/ubuntu-vg/ubuntu-lv
Output

Finally, we need to use this command so when you check the disk using df-h command it will show the correct size.
sudo resize2fs -p /dev/mapper/ubuntu--vg-ubuntu--lv
Done. Now check using df -h command
sudo df -h
Output
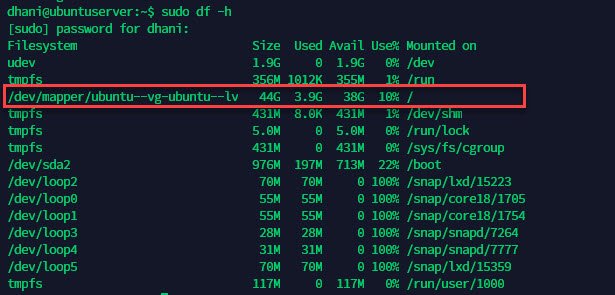
As you can see now my filesystem size is 44 GB.
Hai, thanks for the write-up. Little thing that did not work for me:
using Ubuntu 20.04 I just had to use
#lvextend -l +100%FREE /dev/ubuntu-vg/ubuntu-lv
and not
#lvm lvextend -l +100%FREE /dev/ubuntu-vg/ubuntu-lv
in fact, the lvm command would only allow me to work with physical disks (/dev/sda, etc…) – with the command without lvm I could extend the logical volume and then resize.
the rest worked just as you wrote.
thanks