It’s been a while I am not writing about Hackintosh stuff. There are a lot of things that happened during that time. The latest version of OpenCore is now hit version 0.7.6. There must be many interesting things going on. In this article, I am going to show you how to create the macOS USB installer for Hackintosh. I am going to use OpenCore 0.7.6 and Windows 10 to build this USB installer.
Steps to Create macOS Monterey USB Installer using OpenCore 0.7.6 on Windows 10
Before we go through the installation process, below is the checklist you will need to prepare
- A USB flash drive with 4 GB or more
- Internet connection
- A Windows 10 PC or laptop
Step 1. Install Python
It is mandatory to have Python installed on your Windows 10. You can download the latest Python package for Windows 10 using the link below.
https://www.python.org/downloads/windows/
Step 2. Download OpenCore 0.7.6
This tutorial is based on OpenCore 0.7.6. If a newer version is released, you may or may not use this tutorial as your guide. First, grab the OpenCore 0.7.6 package below.
https://github.com/acidanthera/OpenCorePkg/releases/download/0.7.6/OpenCore-0.7.6-RELEASE.zip
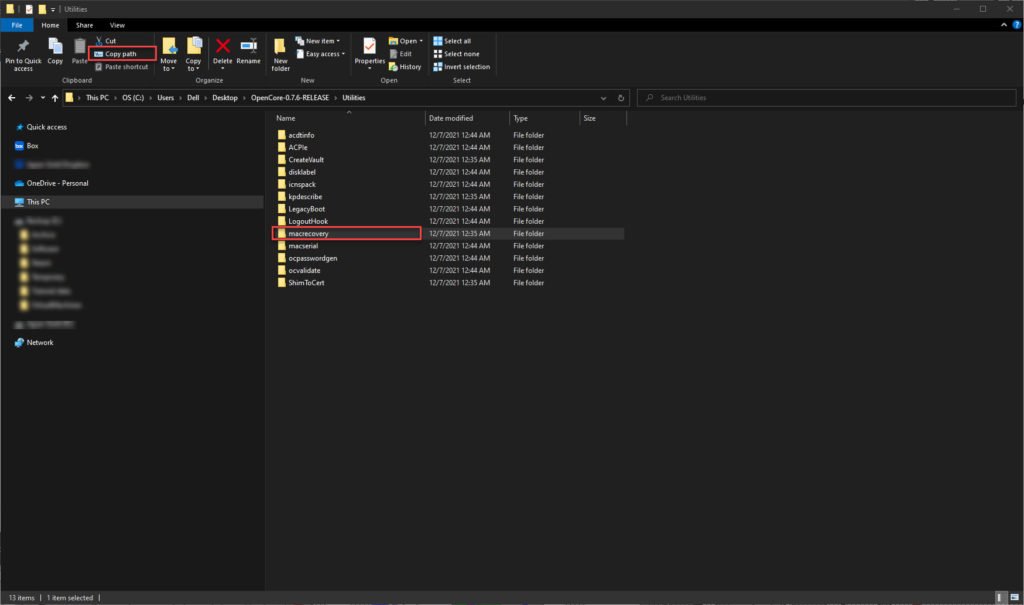
Extract the zip file and then you should have the following folder structure

Now open the Utilities folder and then copy the macrecovery folder path.

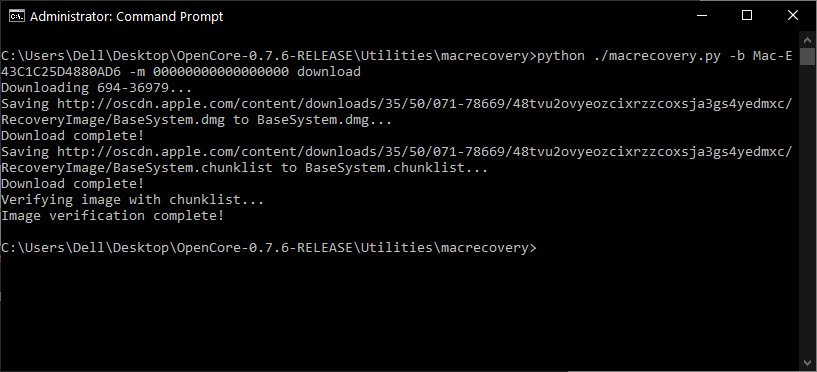
Next open command prompt as Administrator. Type the “cd” command and then paste the path there.

Next, paste this command onto the command prompt
python ./macrecovery.py -b Mac-E43C1C25D4880AD6 -m 00000000000000000 downloadThe download process will start

At this point, we have successfully downloaded the macOS Monterey installation files.
Step 3. Format the USB Drive
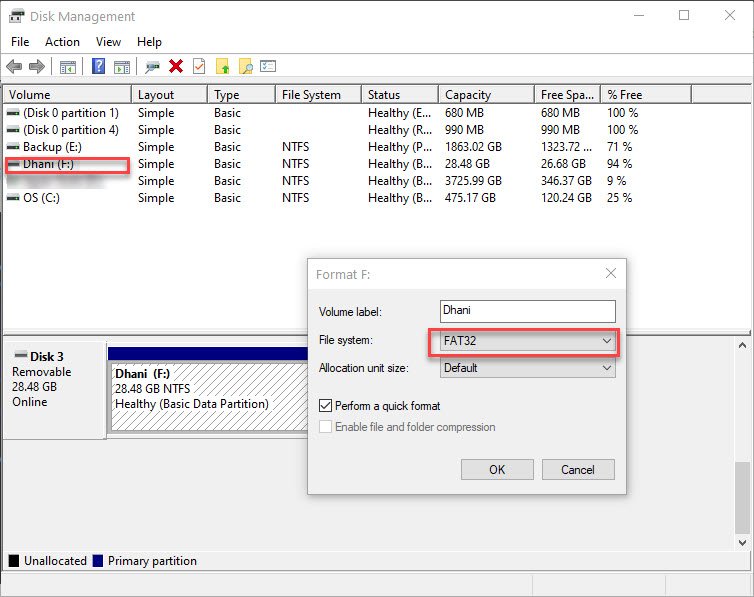
Before we can use the USB drive, we need to format it first. Use the FAT32 file system. Open the Disk Management by right-clicking the Windows Start menu and then click Disk Management.

Wait until the process completes.
Step 4. Copy macOS Monterey Installation files
In the USB drive, we need to create a new folder called com.apple.recovery.boot . And then copy the following two files from the macrecovery folder and paste them into the com.apple.recovery.boot folder in the flash disk.
- BaseSystem.chunklist
- BaseSystem.dmg

Step 5. Copy the EFI folder
Now we need to copy the EFI folder into the root of the USB drive. In this case, I will not explain how to make the EFI for your hardware. I am currently preparing a video showing how to create EFI folder for various hardware. The final folder structure in the USB drive should look like this.

Wrapping Up
Creating macOS Monterey USB installer in Windows 10 is pretty easy. The tough part is making the EFI folder for our hardware. I hope I can share how to make the EFI for macOS Monterey in the future. Thanks for reading this article and see you next time.

Leave a Reply