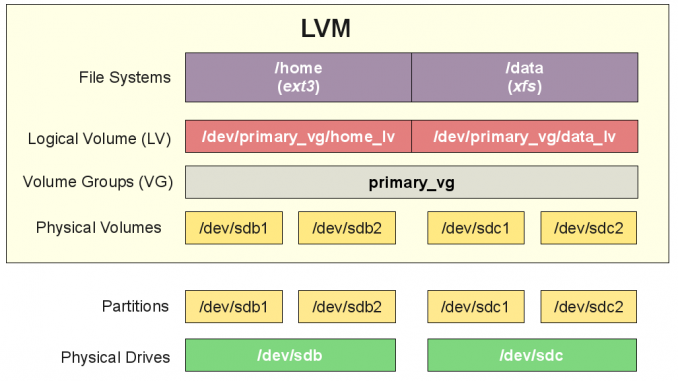
This tutorial is going to show you how to create and manage LVM disk on Ubuntu 17.04. LVM (Logical Volume Management) is a powerful disk management system that provide a robust, easy expandable disks in the future. We can easily shrink or extend existing volume when using LVM scheme. By default, Ubuntu 17.04 does not support LVM so we need to install a package called lvm2. This package will be installed by default if we use the LVM scheme during Ubuntu 17.04 installation.
What you will learn on this tutorial
- Create new Physical Volume (PV)
- Create new Volume Group (VG)
- Create new Logical Volume (LG)
Steps to create new LVM disks on Ubuntu 17.04
Before we can use LVM, we need to install lvm2 package first. If you have this package already, you can skip it.
Step 1. Install LVM2 package
root@dhani-VirtualBox:~# apt install lvm2
Reading package lists... Done
Building dependency tree
Reading state information... Done
The following additional packages will be installed:
  dmeventd libdevmapper-event1.02.1 liblvm2app2.2 liblvm2cmd2.02 libreadline5
Suggested packages:
  thin-provisioning-tools
Step 2. Prepare the disks
On this example, I have added 2 more disks to my existing Ubuntu system. I will create new Volume Group with these two disks. First, we need to check the current disk layout.
root@ubuntu-server:~# lsblk
NAME                          MAJ:MIN RM  SIZE RO TYPE MOUNTPOINT
sr0                            11:0    1  685M  0 rom
vda                           252:0    0   10G  0 disk
`-vda1                        252:1    0   10G  0 part
  |-ubuntu--server--vg-root   253:0    0    9G  0 lvm  /
  `-ubuntu--server--vg-swap_1 253:1    0 1020M  0 lvm  [SWAP]
vdb                           252:16   0   20G  0 disk
vdc                           252:32   0   25G  0 disk
As you can see, the current system already have a LVM layout (vda) and you can see also there are two disks (vdb and vdc) available.
Create New Physical Volumes
First, we need to create physical volume on our disk or partition. Since I want to use the entire disk, I don’t have to create partition first. We can directly create new physical volume on both disks.
root@ubuntu-server:~# pvcreate /dev/vdb
  Physical volume "/dev/vdb" successfully created.
root@ubuntu-server:~# pvcreate /dev/vdc
  Physical volume "/dev/vdc" successfully created.
See all physical volumes on our system using pvdisplay command
root@ubuntu-server:~# pvdisplay
  --- Physical volume ---
  PV Name               /dev/vda1
  VG Name               ubuntu-server-vg
  PV Size               10.00 GiB / not usable 2.00 MiB
  Allocatable           yes
  PE Size               4.00 MiB
  Total PE              2559
  Free PE               9
  Allocated PE          2550
  PV UUID               po49qK-xdN8-2PH4-AHTK-Oy9A-b700-FuStPW

  "/dev/vdb" is a new physical volume of "20.00 GiB"
  --- NEW Physical volume ---
  PV Name               /dev/vdb
  VG Name
  PV Size               20.00 GiB
  Allocatable           NO
  PE Size               0
  Total PE              0
  Free PE               0
  Allocated PE          0
  PV UUID               iQlgZB-LlYQ-N01P-D56H-Dmci-UIzX-0F8pSP

  "/dev/vdc" is a new physical volume of "25.00 GiB"
  --- NEW Physical volume ---
  PV Name               /dev/vdc
  VG Name
  PV Size               25.00 GiB
  Allocatable           NO
  PE Size               0
  Total PE              0
  Free PE               0
  Allocated PE          0
  PV UUID               CVACIX-mdUH-mzUb-WBeo-2Ij8-s4jI-Mrvlrx
Create new VolumeGroup
Now lets create a new Volume Group with the /dev/sdb disk first.
root@ubuntu-server:~# vgcreate manjaro_lvm /dev/vdb
  Volume group "manjaro_lvm" successfully created
The command above create a new VolGroup called manjaro_lvm with /dev/vdb disk. Off course you can modify that with your own settings. Now we can see our new VG using vgdisplay command.
root@ubuntu-server:~# vgdisplay
  --- Volume group ---
  VG Name               ubuntu-server-vg
  System ID
  Format                lvm2
  Metadata Areas        1
  Metadata Sequence No  3
  VG Access             read/write
  VG Status             resizable
  MAX LV                0
  Cur LV                2
  Open LV               2
  Max PV                0
  Cur PV                1
  Act PV                1
  VG Size               10.00 GiB
  PE Size               4.00 MiB
  Total PE              2559
  Alloc PE / Size       2550 / 9.96 GiB
  Free  PE / Size       9 / 36.00 MiB
  VG UUID               EIUd8I-enfK-5aAz-CWhN-nBaw-vy5U-S3wX8p

  --- Volume group ---
  VG Name               manjaro_lvm
  System ID
  Format                lvm2
  Metadata Areas        1
  Metadata Sequence No  1
VG Access             read/write
  VG Status             resizable
  MAX LV                0
  Cur LV                0
  Open LV               0
  Max PV                0
  Cur PV                1
  Act PV                1
  VG Size               20.00 GiB
  PE Size               4.00 MiB
  Total PE              5119
  Alloc PE / Size       0 / 0
  Free  PE / Size       5119 / 20.00 GiB
  VG UUID               2RTcyM-yHcM-qgrc-NZjs-ydf9-ZIRF-tZ5wJy
Create New Logical Volume
Now we can create new Logical Volume. For example, this command will create new LV called manjaro_lv01 inside the Volume Group manjaro_lvm created earlier.
root@ubuntu-server:~# lvcreate -L 5G -n manjaro_lv01 manjaro_lvm
  Logical volume "manjaro_lv01" created.
Format Logical Volume
Before we can use the new logical volume to store data, we need to format it. For example, I will format the manjaro_lv01 in ext4 filesystem.
mkfs.ext4 /dev/mapper/manjaro_lvm-manjaro_lv01
Example
root@ubuntu-server:~# mkfs.ext4 /dev/mapper/manjaro_lvm-manjaro_lv01
mke2fs 1.43.4 (31-Jan-2017)
Creating filesystem with 1310720 4k blocks and 327680 inodes
Filesystem UUID: a152ff83-f2f2-4037-9050-4e7144fced1e
Superblock backups stored on blocks:
        32768, 98304, 163840, 229376, 294912, 819200, 884736

Allocating group tables: done
Writing inode tables: done
Creating journal (16384 blocks): done
Writing superblocks and filesystem accounting information: done
Mount the new volume
mount /dev/mapper/manjaro_lvm-manjaro_lv01 /mnt
At this point, we’ve learned how to create new physical volume, volume group, logical volume. Stay tuned on this blog. Next I will post about how to extend the size of Volume Group and Logical Volume.

Leave a Reply