If you are planning to install software in Linux Mint 19 which requires Java, you will need to install the Java Runtime Environment (JRE) first. By default, Oracle Java JRE is not installed on Linux Mint 19. Linux Mint comes with OpenJDK instead. But don’t worry, we can easily install Java on Mint. This tutorial will guide you to install Oracle Java on Linux Mint 19. Please note that there is also the open source version of Java, OpenJava. But on this tutorial, I am going to install the Oracle Java instead of OpenJava. I hope in the next tutorial I can write the tutorial for OpenJava.
For example, I was trying to install DBVisualizer on Linux Mint 19 but I got the following error during installation:
dhani@dhani-virtual-machine:~/Downloads$ sudo ./dbvis_linux_10_0_15.sh
[sudo] password for dhani:
No suitable Java Virtual Machine could be found on your system.
The version of the JVM must be at least 1.8 and at most 9.
Please define INSTALL4J_JAVA_HOME to point to a suitable JVM.
This means, we need to install Java first. So let’s do it.
Steps to Install Oracle Java on Linux Mint 19
Before we install Oracle Java, let’s check our current Java installation. Use the command below to check which Java version we have.
java --version
Output:
openjdk 10.0.2 2018-07-17
OpenJDK Runtime Environment (build 10.0.2+13-Ubuntu-1ubuntu0.18.04.3)
OpenJDK 64-Bit Server VM (build 10.0.2+13-Ubuntu-1ubuntu0.18.04.3, mixed mode)
Step 1. Download Oracle Java JRE
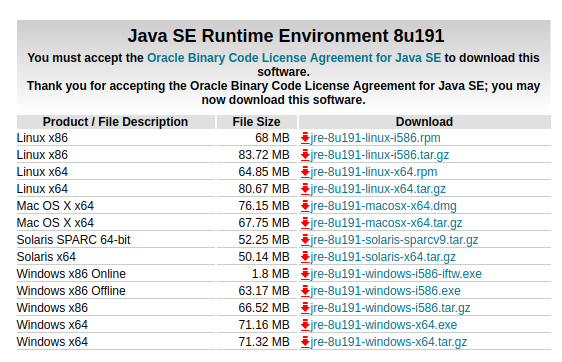
Download the Oracle Java from this website. Click the JRE section and then you will need to select the correct version that match with your system architecture.
Choose the Linux x64 .tar.gz if you are running 64 bit Linux. Save to your Download directory.
Step 2. Extract And Install Oracle Java
Now open Terminal and cd to the download directory. In this example, I downloaded the file to my Downloads directory
cd ~/Downloads
Now let’s extract the file
tar -xvf jre-8u191-linux-x64.tar.gz
The command will produce a new directory: jre1.8.0_191. Now move the directory to /usr/lib/jvm
sudo mv jre1.8.0_191 /usr/lib/jvm/
Now run the following command to configure Java
sudo mv /usr/bin/java java_backup
sudo ln -s /usr/lib/jvm/jre1.8.0_191/bin/java /usr/bin/java
Now let’s check the Java version once again
java -version
Output
java version "1.8.0_191"
Java(TM) SE Runtime Environment (build 1.8.0_191-b12)
Java HotSpot(TM) 64-Bit Server VM (build 25.191-b12, mixed mode)
Done. Now we have the Oracle Java Runtime Environment active on Linux Mint 19.


Leave a Reply