Introduction
In this article, we will show you How to Install OBS Studio on macOS Sequoia Hackintosh. OBS Studio is a powerful open-source software for video recording and live streaming. However, running it on a macOS Sequoia Hackintosh can be tricky due to potential hardware and software compatibility issues. This guide will walk you through the installation process, ensuring a smooth experience.
Prerequisites
Before proceeding with the installation, ensure that:
- Your Hackintosh is running macOS Sequoia without major stability issues.
- You have administrator privileges.
- Your system has at least 4GB of RAM and a decent GPU for smooth performance.
- You have an active internet connection.
Step-by-Step Guide to Install OBS Studio on macOS Sequoia Hackintosh
Step 1: Download OBS Studio
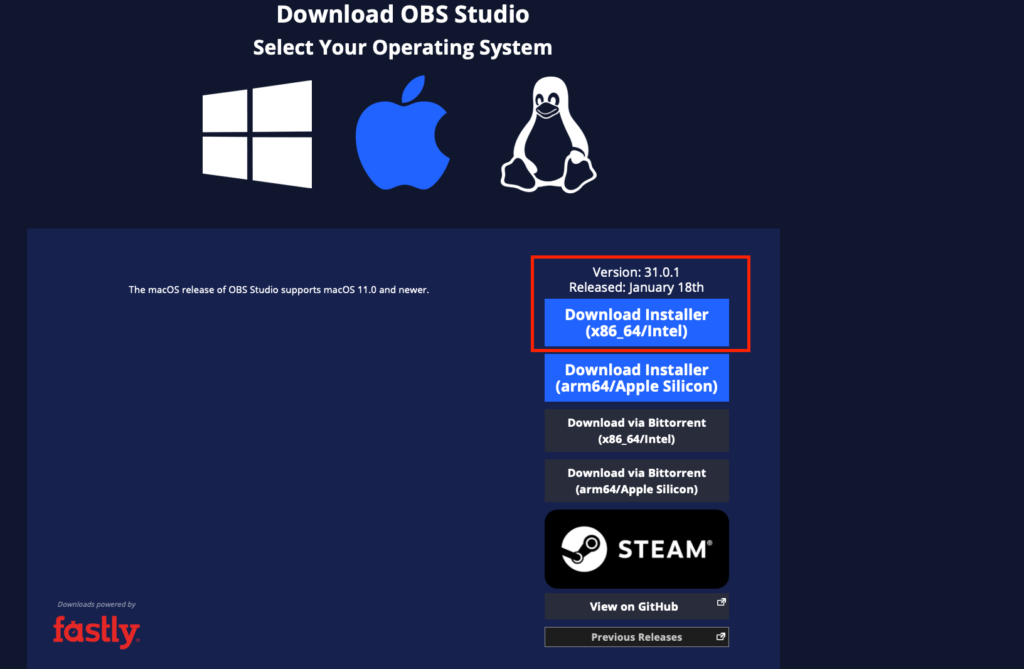
- Open your preferred web browser and navigate to the official OBS Studio website.
- Click on the macOS download link.
- Wait for the
.dmgfile to download completely.
Important Note:
Since a Hackintosh is based on x86_64/Intel platform, you will need to choose the correct version of the OBS. Make sure you download the x86_64/Intel version from the website. Do not choose the arm64/Apple Silicon, it won’t work.

Step 2: Install OBS Studio on macOS Sequoia Hackintosh
- Locate the downloaded
.dmgfile in your Downloads folder. - Double-click the file to open it.
- Drag the OBS Studio icon into the Applications folder.
Step 3: Grant Necessary Permissions
Since macOS Sequoia has stringent security policies, you may need to allow OBS Studio to access screen recording and microphone inputs.
- Open System Settings.
- Go to Privacy & Security > Screen Recording.
- Find OBS Studio in the list and enable the toggle.
- Repeat this process for Microphone Access under Privacy & Security.
Step 4: Fix Potential Hackintosh Compatibility Issues
On a Hackintosh, certain configurations may cause issues with OBS Studio, such as:
- Black Screen Issue: If OBS displays a black screen, ensure that your GPU is correctly configured in your Hackintosh setup (using WhateverGreen.kext and appropriate framebuffer patches).
- Performance Issues: If OBS runs slowly, try enabling Metal Renderer in OBS settings.
- Audio Issues: Use Loopback or BlackHole (third-party audio routing tools) to capture system sound correctly.
Step 5: Configure OBS Studio
- Launch OBS Studio from the Applications folder.
- Follow the Auto-Configuration Wizard for optimal settings.
- Adjust video settings under Settings > Video, setting the base resolution to match your screen.
- Set up your sources (e.g., screen capture, webcam, audio input).
- Test a quick recording to ensure everything is functioning properly.
Troubleshooting Tips
- OBS crashes on startup: Ensure that your Hackintosh has the latest macOS updates and that OBS Studio is updated to the latest version.
- No audio input detected: Go to OBS Settings > Audio, and manually select the input and output devices.
- Encoding overload error: Lower the resolution or change the encoder settings in OBS Settings > Output.
Conclusion
Installing OBS Studio on a macOS Sequoia Hackintosh requires a few additional steps compared to a standard Mac, but by following this guide, you can ensure a smooth and optimized experience. Whether you’re recording tutorials or live streaming, OBS Studio remains an essential tool for content creators. Thanks for reading this How to Install OBS Studio on macOS Sequoia Hackintosh.
For more Hackintosh guides and troubleshooting tips, stay tuned to our blog!

Leave a Reply