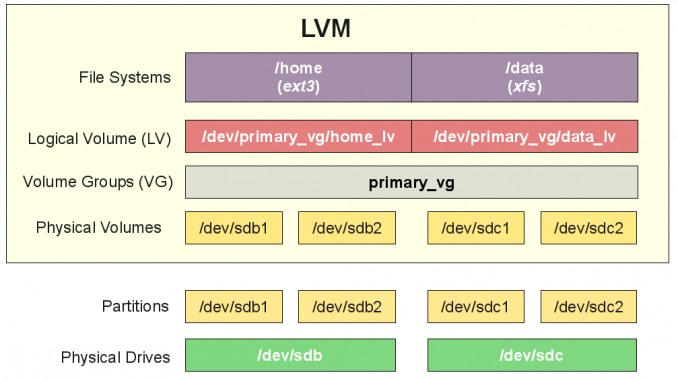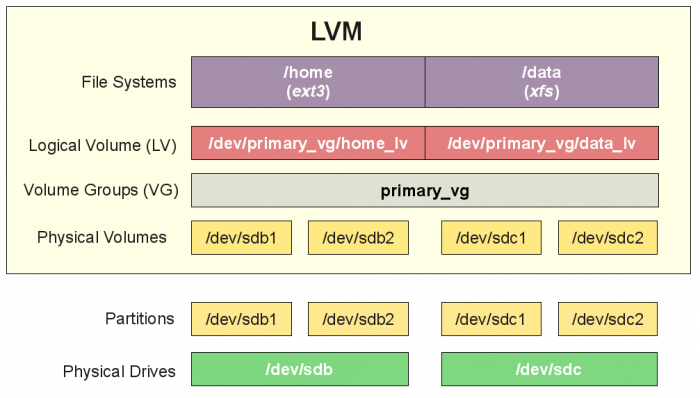
Arch Linux Tutorial – On this tutorial, we will show you how to configure LVM on Arch Linux 2017. LVM stands for Logical Volume Manager that utilize device-mapper feature to provide a system partitions independent of underlying disk layout. There are many benefits of using LVM on Arch Linux and also other Linux system. We can add any number of disks as one big disk. Source.

We will show you how to create new physical volume, volume group and also logical volume. There are few steps to configure LVM on Arch Linux. To complete the steps to configure LVM on Arch Linux, we will learn the following:
- Create new Physical Volume (PV)
- Create new Volume Group (VG)
- Create new Logical Volume (LV)
On this tutorial, we have three disks connected to our Arch Linux. The following are output from fdisk command. We have three physical disks attached on the system.
[root@archServer]: /># fdisk -l
Disk /dev/vda: 20 GiB, 21474836480 bytes, 41943040 sectors
Units: sectors of 1 * 512 = 512 bytes
Sector size (logical/physical): 512 bytes / 512 bytes
I/O size (minimum/optimal): 512 bytes / 512 bytes
Disklabel type: dos
Disk identifier: 0x09bd7cd6

Device     Boot   Start      End  Sectors  Size Id Type
/dev/vda1          2048   436223   434176  212M 83 Linux
/dev/vda2       1484800 41943039 40458240 19.3G 83 Linux
/dev/vda3        436224  1484799  1048576  512M 82 Linux swap / Solaris

Partition table entries are not in disk order.


Disk /dev/vdb: 10 GiB, 10737418240 bytes, 20971520 sectors
Units: sectors of 1 * 512 = 512 bytes
Sector size (logical/physical): 512 bytes / 512 bytes
I/O size (minimum/optimal): 512 bytes / 512 bytes


Disk /dev/vdc: 20 GiB, 21474836480 bytes, 41943040 sectors
Units: sectors of 1 * 512 = 512 bytes
Sector size (logical/physical): 512 bytes / 512 bytes
I/O size (minimum/optimal): 512 bytes / 512 bytes
As you can see, we have three disks (vda, vdb and vdc). The vda is used by Arch filesystem and now we will create a LVM layout using vdb and vdc.
Step 1. Create new Physical Volume
As a part of configure LVM on Arch Linux, we need to create physical volume. The following command will create a new physical volume on /dev/vdb. Change /dev/vdb with your disk.
[root@archServer]: /># pvcreate /dev/vdb
  Physical volume "/dev/vdb" successfully created.
Repeat the steps to the rest disks.
[root@archServer]: /># pvcreate /dev/vdc
  Physical volume "/dev/vdc" successfully created.
Now we can check our new physical volume. Use pvdisplay command as follow:
[root@archServer]: /># pvdisplay
  "/dev/vdc" is a new physical volume of "20.00 GiB"
  --- NEW Physical volume ---
  PV Name               /dev/vdc
  VG Name
  PV Size               20.00 GiB
  Allocatable           NO
  PE Size               0
  Total PE              0
  Free PE               0
  Allocated PE          0
  PV UUID               69sw2S-g5kR-vCMe-Y2s9-QbIZ-EKHu-hxUOi4

  "/dev/vdb" is a new physical volume of "10.00 GiB"
  --- NEW Physical volume ---
  PV Name               /dev/vdb
  VG Name
  PV Size               10.00 GiB
  Allocatable           NO
  PE Size               0
  Total PE              0
  Free PE               0
  Allocated PE          0
  PV UUID               0xBwdE-8SYK-hEr7-Bl8i-tfUs-0wg9-EjOWo9
Step 2. Create new Volume Group (VG)
After we create new physical volumes, we need to create new volume group with the physical volumes we have. For example, we will create new VG called archVG.
[root@archServer]: /># vgcreate archVG /dev/vdb /dev/vdc
  Volume group "archVG" successfully created
Now display the volume group with vgdisplay command.
[root@archServer]: /># vgdisplay
  --- Volume group ---
  VG Name               archVG
  System ID
  Format                lvm2
  Metadata Areas        2
  Metadata Sequence No  1
  VG Access             read/write
  VG Status             resizable
  MAX LV                0
  Cur LV                0
  Open LV               0
  Max PV                0
  Cur PV                2
  Act PV                2
  VG Size               29.99 GiB
  PE Size               4.00 MiB
  Total PE              7678
  Alloc PE / Size       0 / 0
  Free  PE / Size       7678 / 29.99 GiB
  VG UUID               GbzS6G-Vumh-m3Wp-Wigu-Poho-a9UE-OddXKY
Now we have new VG called archVG with size of around 30 GB (consist of 20 GB and 10 GB physical volumes).
Step 3. Logical Volume
After we have Volume Group, we can create new Logical Volume (LV) inside our Volume Group. This LV, can then be formatted and mounted for further use.
Example, Create 5 GB Logical Volume called archLV01 on archVG:
[root@archServer]: /># lvcreate -L 5G archVG -n archLV01
  Logical volume "archLV01" created.
We can create multiple LVs on a single VG with the similar command/syntax as above.
[root@archServer]: /># lvcreate -L 15G archVG -n archLV02
  Logical volume "archLV02" created.
Display Logical Volumes
[root@archServer]: /># lvdisplay
  --- Logical volume ---
  LV Path                /dev/archVG/archLV01
  LV Name                archLV01
  VG Name                archVG
  LV UUID                B6XJOW-ba7r-z3Gq-ylug-GojR-7Zb6-GSXqoZ
  LV Write Access        read/write
  LV Creation host, time archServer, 2017-08-12 16:37:19 +0300
  LV Status              available
  # open                 0
  LV Size                5.00 GiB
  Current LE             1280
  Segments               1
  Allocation             inherit
  Read ahead sectors     auto
  - currently set to     256
  Block device           253:0

  --- Logical volume ---
  LV Path                /dev/archVG/archLV02
  LV Name                archLV02
  VG Name                archVG
  LV UUID                matA0Y-3Rop-flQe-axKB-qTwy-uXrD-oKG8Nq
  LV Write Access        read/write
  LV Creation host, time archServer, 2017-08-12 16:40:19 +0300
  LV Status              available
  # open                 0
  LV Size                15.00 GiB
  Current LE             3840
  Segments               1
  Allocation             inherit
  Read ahead sectors     auto
  - currently set to     256
  Block device           253:1
Display the disk layout
Now we can see our new disk layout with lsblk command
[root@archServer]: /># lsblk
NAME              MAJ:MIN RM  SIZE RO TYPE MOUNTPOINT
sr0                11:0    1  485M  0 rom
vda               254:0    0   20G  0 disk
├─vda1            254:1    0  212M  0 part /boot
├─vda2            254:2    0 19.3G  0 part /
└─vda3            254:3    0  512M  0 part [SWAP]
vdb               254:16   0   10G  0 disk
└─archVG-archLV01 253:0    0    5G  0 lvm
vdc               254:32   0   20G  0 disk
└─archVG-archLV02 253:1    0   15G  0 lvm
Format the new volume
Now we can format our new logical volumes.
[root@archServer]: /># mkfs.ext4 /dev/mapper/archVG-archLV01
mke2fs 1.43.5 (04-Aug-2017)
Creating filesystem with 1310720 4k blocks and 327680 inodes
Filesystem UUID: 4d8a7506-da05-4e8c-976b-ee2628054e81
Superblock backups stored on blocks:
        32768, 98304, 163840, 229376, 294912, 819200, 884736

Allocating group tables: done
Writing inode tables: done
Creating journal (16384 blocks): done
Writing superblocks and filesystem accounting information: done
Now mount it
[root@archServer]: /># mount /dev/mapper/archVG-archLV01 /mnt
So now we have completed configure LVM on Arch Linux 2017. In the future, I will show you how to extend existing Volume Group and Logical Volume. Stay tuned on this blog.

Leave a Reply